Similarly to the common cooking recipes seen online, I’ll start this “How-to-get-rids-of-ads” recipe with a heartfelt and winding story.
Part 1 - In Which We Start At a Low
On a warm and pleasant evening, June 20th, 2019 to be exact, I felt it was a perfect time for a run. A few days earlier, I had bought a phone holder for jogging – one of those you strap to your arm designed specifically for my brand-new OnePlus 5T. However, there was a slight hiccup: they hadn’t considered the addition of a protective case in the design.
That evening, as I was transferring my smartphone from its protective case to the holder, it slipped from my hand and made a distinctive flat sound as it landed screen-first on the floor.

To my relief, everything seemed fine at first glance. “Lucky me, always choosing sturdy phones”, I thought, tempting fate as I went off to my run.
However, upon returning and placing the phone back into its case, I noticed a small, ominous black dot on the top-right side of the screen. It wasn’t long before a pink hue began spreading from the dot, which also grew in size.
In a panic, I rushed to my computer to back up everything: photos, contacts, files, and most importantly, all authenticator codes to another device1.
An hour or two later, the screen had turned completely pink and the dot was the size of my thumb. Having finished backing up everything, I went to sleep. By the next morning, the screen had turned entirely black. Despite this, I could still elicit a slight vibration from the screen’s haptic feedback when pressing certain points, suggesting that the touchscreen was partially functional.
Feeling bad about the whole ordeal, I threw the thing into my electronics drawer and forgot about it.
Part 2 - In Which an Idea Is Born
Fast forward to 2020, I came across an article about deploying a tool called Pi-Hole on a Raspberry Pi to block ads at home. (Shoutout to Ran Bar-Zik for this post).
Pi-Hole acts as a DNS server for your home network, filtering ads and malicious websites efficiently and effectively based on a dynamically updated denylist.
I won’t go into detail about how it works (in short: controlling a device’s DNS is enough to achieve powerful website filtering capabilities), but put simply Pi-Hole is an advanced and powerful ad-blocker that automatically works on any device while it’s connected to your network.
Since it operates at the network level, it isn’t be affected by whoever controls the browser or websites you’re using, and will also able to block ads from appearing on embedded devices, such as smart TVs and Android apps.
Intrigued by the concept and deterred by the cost (and shipment price) of a Raspberry Pi. I suddenly remembered the defunct OnePlus 5T gathering dust inside my electronics drawer.
The smartphone is the perfect candidate to serve as a Pi-Hole! It connects to the home Wi-Fi, runs on an Android OS which is quite similar to a Raspberry Pi’s Linux distribution, and boasts enough power to easily function as the household’s DNS server.

As is often the case on the internet, I quickly discovered that others had the same idea of turning their old phones into Pi-Holes. Specifically, this great guide described how to use Linux-deploy on your rooted smartphone to run a Linux machine on top of the Android OS so you can easily run Pi-Hole on it.
Wait. Did that say ‘rooted’? That’s the catch - we need a rooted device as a prerequisite. However, I haven’t had the chance to root my OnePlus 5T with it being so new. I didn’t even think to enable USB debugging before the screen died, which is one setting required to root the phone.
The problem with my idea suddenly became clear
Can you root a phone if its screen is completely blank?
Well, I can do most of the rooting process by remote controlling the device. To be able to remote control, however, we still need the USB debugging setting enabled. Is it possible to do this without seeing the screen?
That’s a good question, and 2 hours into scratching the bottom of the internet barrel, I stumbled upon a genius suggestion on StackExchange:
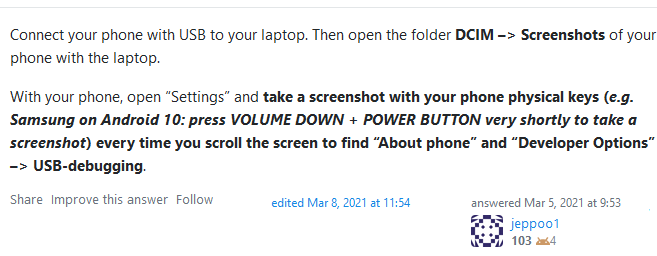
While this screenshot method (the name by me) is brilliant, it implies you’re able to read files from the smartphone. This needs switching the phone to File Transfer mode after connecting to the PC. While difficult, switching to this mode is much (much) more achievable than blindly enabling USB debugging.
Part 3 - In Which the Recipe Is Finally Given
Here’s the process of converting a functional smartphone (whose screen’s broken) to block ads:
- Connect the phone via USB to your PC and enable File Transfer mode on the phone
- Use the screenshot method to navigate through the menus and switch on developer mode. Then enable USB debugging.2
- Use the
adbandfastboottools to flash a custom recovery that will allow us to root the phone. We’ll use TWRP - Install Magisk on the new custom recovery. At this point, the phone is rooted
- Get and set up Linux-deploy, create and run a Debian machine, and finally install Pi-Hole on it
Every step is easy given that the previous one was done. Well, except for step 1. I was pretty sure enabling MTP only requires a very limited number of screen presses, the problem is I needed to know approximately where to press.
Step 1 - YouTube to the Rescue
I went to trusty old YouTube and searched for video tutorials for enabling File Transfer on the OnePlus 5T. This one clearly shows there’s a notification that pops once you connect the USB cable. You press it twice to open the mode menu and File Transfer is the top option.
I hoped that my OS version wouldn’t deviate too much from what was shown in the video, and went to business: Swipe from the top, press twice approximately at the 1/3 mark of the screen, then press once more somewhere in the first quarter of the screen.
That didn’t work.
I knew I needed to come up with an indicator that the intermediate steps were successful. I realized that if I swiped down, pressing on the top right side of the screen should make the torch light up. Using this as a way to verify that I’m looking at notifications, I eventually managed to press the right places and heard my PC go tang!. A new internal storage popped up - indicating that the phone has switched to File Transfer mode! 🎉
Step 2 - The Screenshot Method
I wouldn’t have believed you if you told me that someday I would take a measuring tape and sticky notes and use them to figure out where to press on a smartphone so I could enable USB debugging, but here we are.
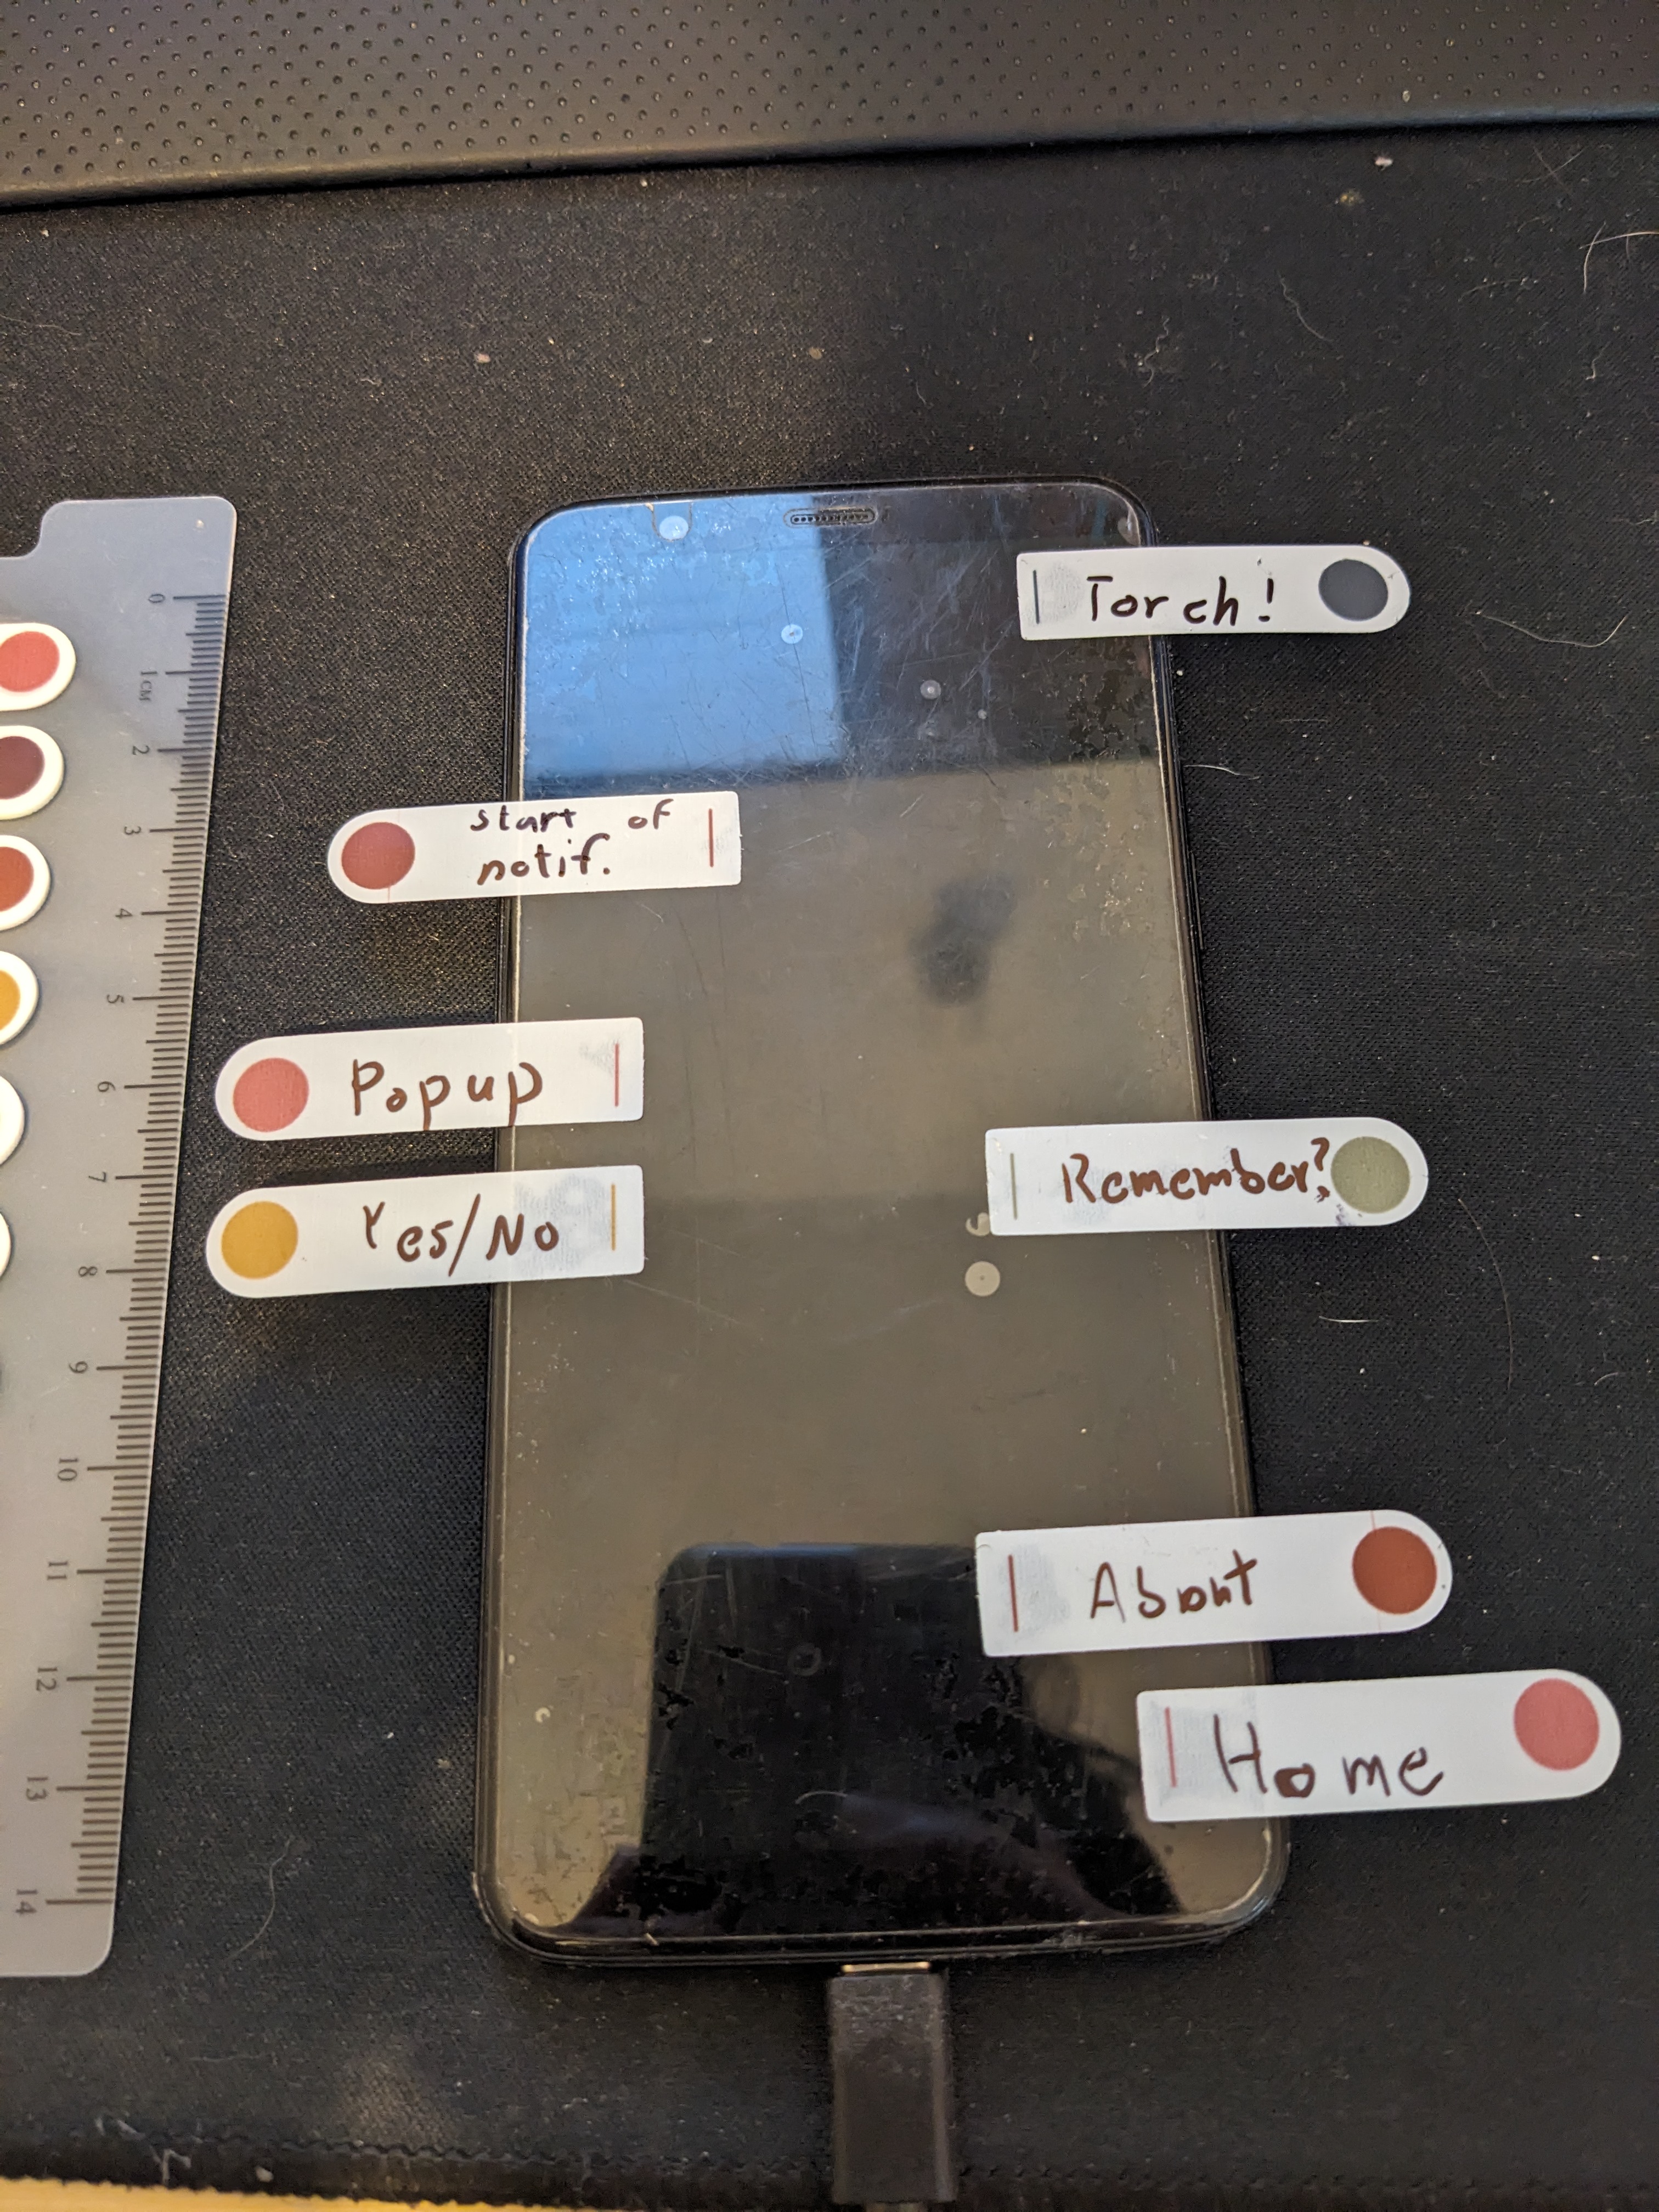
Okay so first swipe down, and press the cog about 4 centimeters from the top, all the way to the right.
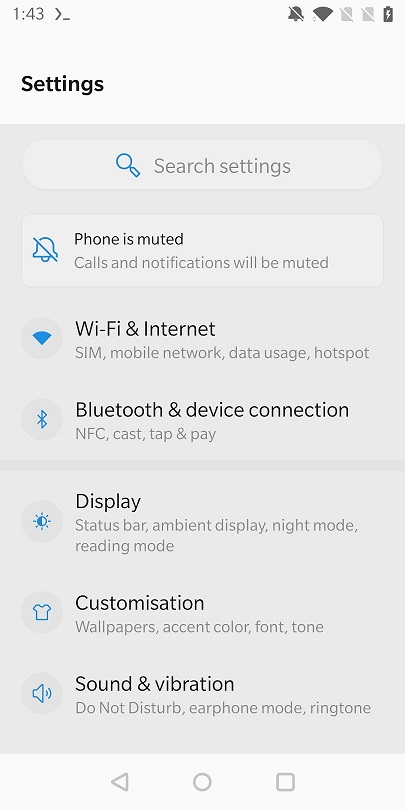
We’re in settings! Swipe all the way down, and press About Phone. Should be right above the Back/Home/Apps buttons which I already marked previously.
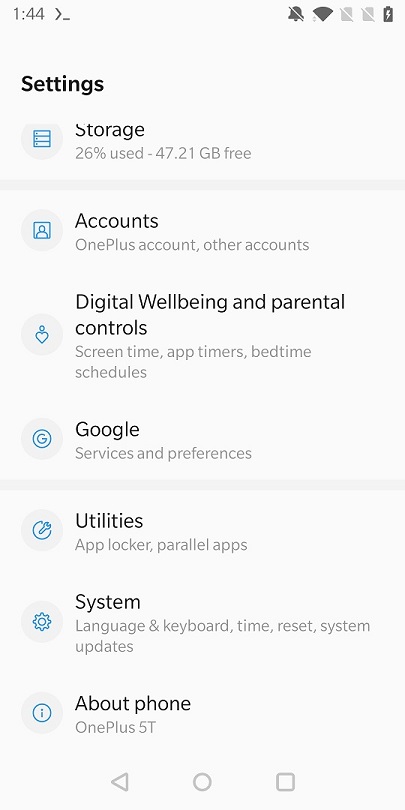
Here we also need to swipe down, and then press Build number 10x times. It has a relatively large hit box so no problems here.
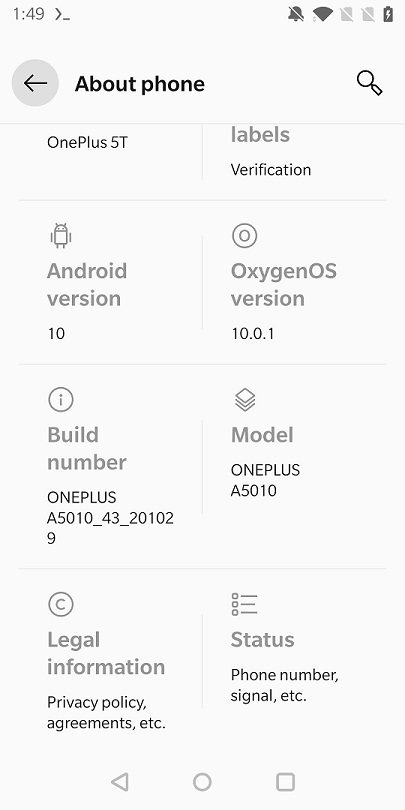
You are now a developer! Press the back button, then on System which is right above About phone and swipe all the way down.
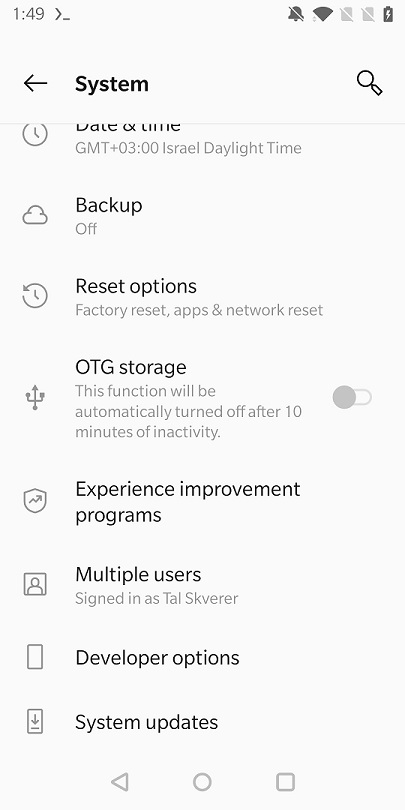
Press Developer options and we’re at the last mile - only need to find USB debugging and press it. Developer options contain dozens of options, and unfortunately USB debugging is stuck somewhere in the middle.
Well, let’s swipe down once or twice and see where we end up.
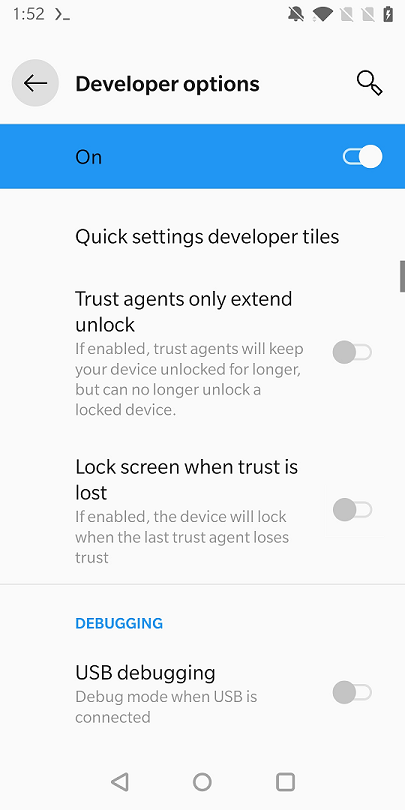
Success! Now only carefully measure and press where it should be approximately…Nothing happened. I typed adb devices into a terminal with trembling fingers and pressed enter…
tal@Tal-PC: ~$ adb devices
* daemon not running; starting now at tcp:5037
* daemon started successfully
List of devices attached
9168bdc0        unauthorized
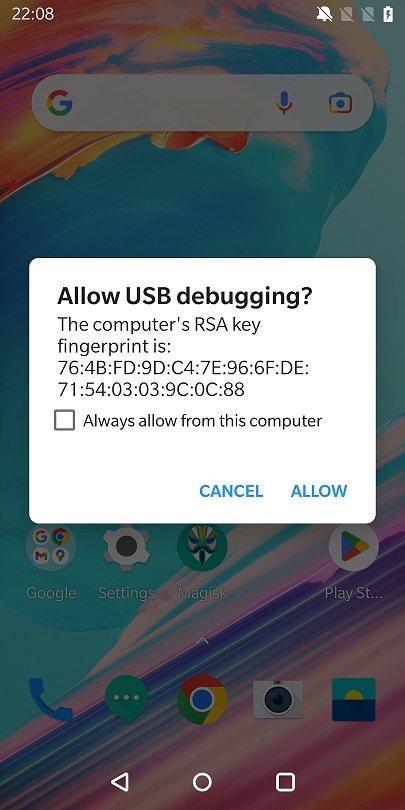
I did it! The last step required pressing allow on the pop-up message, but it stood no chance against the screenshot method, and I got access to the phone!3
Steps 3 & 4 - Rooting
With adb and fastboot working, I enabled OEM unlocking and some other needed settings and it was finally time to root the phone:
$ adb reboot bootloaderto get to the bootloader.$ fastboot oem unlockto OEM unlock the bootloader. As seen in this clip, a warning appears and you need to press YES. Luckily it defaults to YES so we just press Volume Up once.- Once the phone boots up, go back into the bootloader by turning off the phone (Power button for 5 seconds), then hold the Volume Up and Power buttons for a few seconds.
fastboot devicesshould show the device once it booted. $ fastboot flash recovery twrp.imgwhile your TWRP image is located in the same directory.- We now need to boot into recovery mode. This can be done with a few careful clicks on the Volume and Power buttons, or more simply just
$ fastboot reboot recoveryand we’re in our shiny new recovery system. - At this point the phone is rooted and we just want to install something that will manage apps that wish to run as root. One such tool is Magisk. Flashing from recovery involves a couple of clicks and swipes within TWRP. I battled to do this for a while, trying to use the screenshot method here as well using this tool but was unsuccessful. In the end, my good friend (the same one from the Windward post) came to my aid and found the
$ adb sideload magisk.zipcommand, which simply flashes Magisk as we needed.
Finally, we can reboot the system and get our rooted phone. Once the phone booted successfully (the haptic feedback from the Back/Home/Apps buttons confirmed that), it did not react as I expected.
adb did not work. Swiping down to enable File Transfer didn’t work, and enabling the torch didn’t work. Nothing worked. What’s going on?
Step 5 - The Unexpected Setback
The reason for this issue is in the second part of the previous step. You don’t just unlock the bootloader once you press YES but also reset your phone to factory settings (and you can see it being part of the warning in the clip above, something I completely missed).
Due to this reset, USB debugging is again disabled, and the worst part - we have to go through the phone’s initial setup screen, which prevents us from using the screenshot method.
I tried to complete the initial setup process blindly by watching YouTube videos and mimicking the process. I decided to stop after accidentally going into emergency call mode and ringing the police 🚨. Oops.
What now?
Well, remember the realization about being able to use adb while in recovery mode? Turns out that while in this mode, you can simply switch to root!
tal@Tal-PC: ~$ adb shell
OnePlus5T:/ $ su
OnePlus5T:/ # whoami
root
Since settings (including Developer Options and USB debugging) are persistent and saved on the device, we must have the ability to change them, being root and all. There’s also a handy settings command for these actions (which simply edits the relevant system file for you):
$ settings put global development_settings_enabled 1to enable Developer Options$ settings put global adb_enabled 1to enable USB debugging- And to “allow” your computer on the device,
adb push ~/.android/adbkey.pub /data/misc/adb/adb_keysto move youradbpublic key to the device and thenadb shell 'chmod 600 /data/misc/adb/adb_keys',adb shell 'chown system:shell /data/misc/adb/adb_keys'to fix the file’s permission.
After rebooting the phone again, scrcpy will easily take us through the initial setup process. We have a fully rooted phone so we’re ready for the final step!
Step 6 - The Final Stretch
Unlike previous steps, this one didn’t pose much of a challenge. Following the guide I mentioned was a breeze:
I installed Busybox and then Linux-deploy. I set up a Debian machine (with properties that deviated a little from the guide, see Appendix A). Pressed Install from the top right menu and then the START button on the bottom and I have the machine running, not forgetting to allow the app root access by accepting the Magisk pop-up.
From my PC, $ ssh tal@192.168.3.106 -p 22 to connect to the phone via SSH (after connecting the phone to the home local network, of course. You can find the IP in multiple ways, and the easiest one would be through the phone’s Wi-Fi settings page).
A quick update to the Debian sources list (by directly editing /etc/apt/sources.list) so it looks like this:
deb http://deb.debian.org/debian buster main contrib non-free
deb-src http://deb.debian.org/debian buster main contrib non-free
deb http://deb.debian.org/debian-security/ buster/updates main contrib non-free
deb-src http://deb.debian.org/debian-security/ buster/updates main contrib non-free
deb http://deb.debian.org/debian buster-updates main contrib non-free
deb-src http://deb.debian.org/debian buster-updates main contrib non-free
Executing sudo apt update and letting it run for a while to get the machine up-to-date.
I was finally (finally!) ready to install Pi-Hole, which is honestly the easiest part of this recipe.
$ sudo apt install curlto install the curl tool$ suto switch to root.$ curl -sSL https://install.pi-hole.net | bashto download the Pi-Hole installation script and run it.
I left all Pi-Hole settings on default. When choosing an interface, you need to pick the network that Pi-Hole will be the DNS server of. For me, it was wlan0.
There’s a new CLI tool named pihole once the installation is done. Running $ pihole status should hopefully return that Pi-hole blocking is enabled. I then changed my Pi-Hole dashboard’s admin password with the $ pihole -a -p $password command.
Finally, Pi-Hole may have some issues regarding permissions. This can be solved by giving Pihole-related users access to some network-related groups.
$ sudo usermod -a -G aid_net_bt_admin,aid_net_bt,aid_inet,aid_net_raw,aid_net_admin pihole
$ sudo usermod -a -G aid_net_bt_admin,aid_net_bt,aid_inet,aid_net_raw,aid_net_admin www-data
Now it’s time to make Pi-Hole the DNS server in my router. There are a couple of things to keep in mind:
- The phone a.k.a server should have a constant IP address. This can be set up in the router. In mine (tp-link Archer VR600) it’s called Address Reservation. Simply connect between the server’s MAC address and put any IP address in your LAN subnet to reserve it for this MAC address.

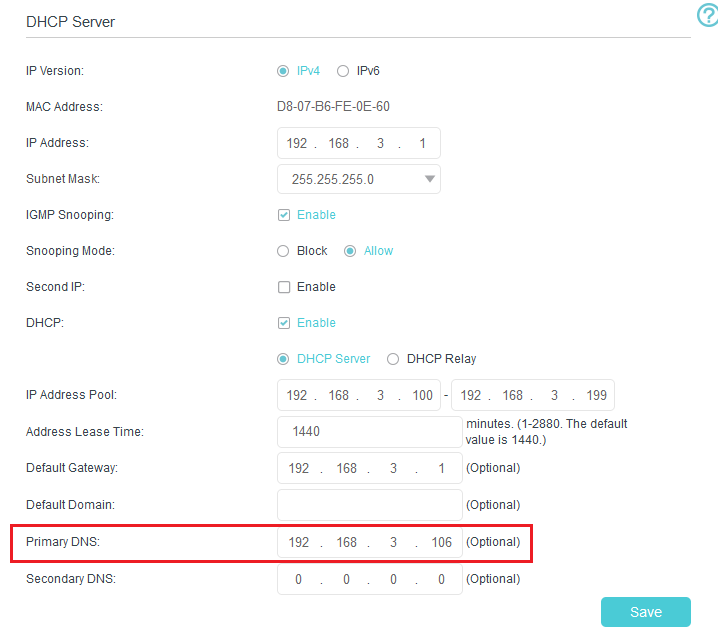
- The DHCP server (usually also the router) should tell all clients connecting to it to use the static IP address defined for the phone as their DNS server. This can also be set up in the router. For me, it’s under LAN Settings, where I can see DHCP Server settings on top. Then it’s just a matter of setting the Primary DNS to be the IP address I reserved.
-
If the server ever becomes unreachable (when I forget to recharge the phone, oops…), then all devices in the house will probably stop working, so it’s worth pointing the secondary DNS to some public DNS like Cloudflare’s.
-
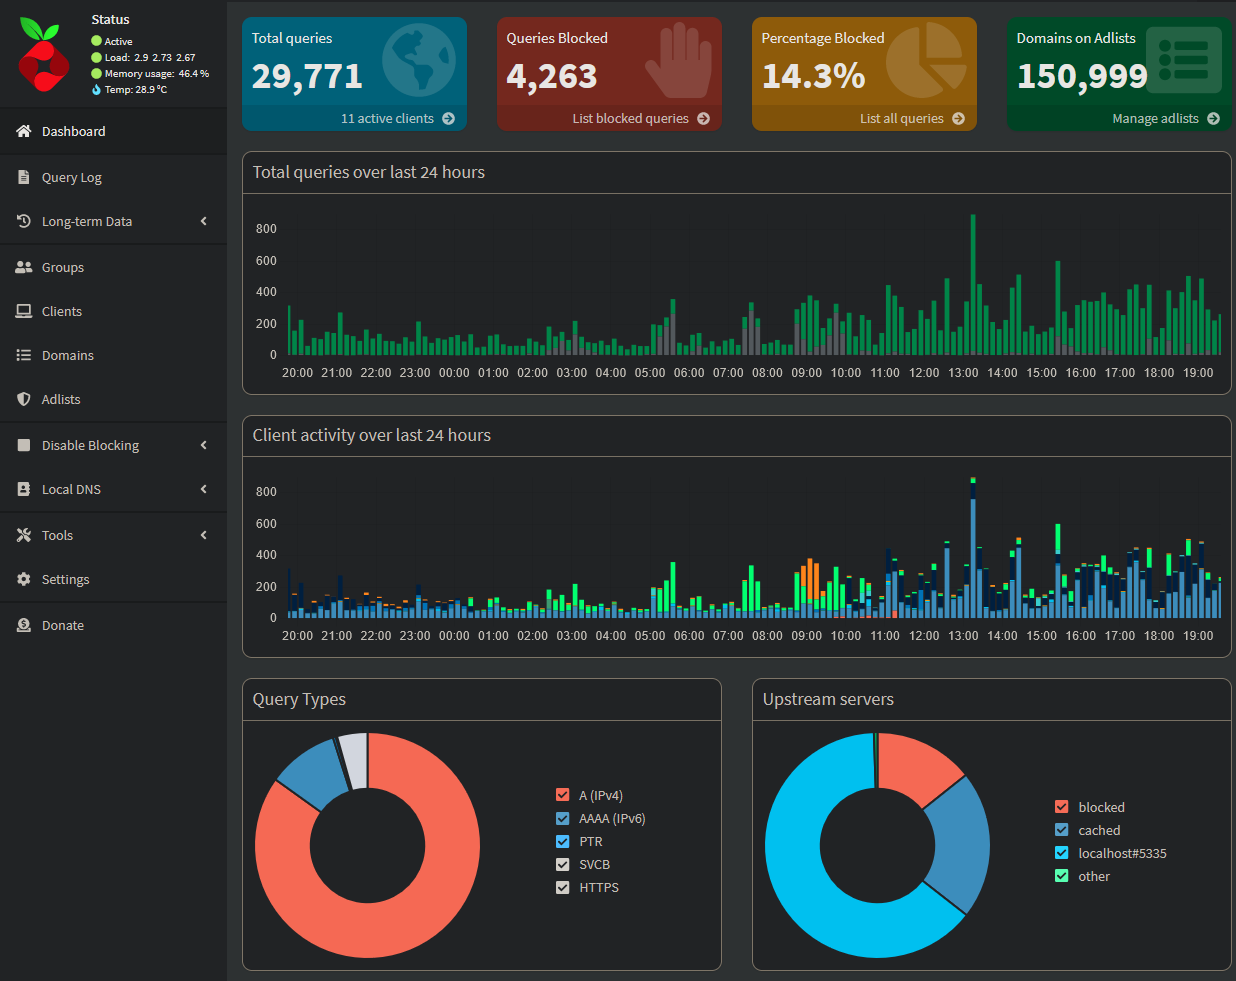
The admin panel is served at http://pi.hole. From there you can view and control many aspects of what Pi-Hole blocks and how. Besides basic (but very beautiful) statistics, you can configure allowed and denied domains, override domain resolving by regex, add new adlists (that contain which domain to block) and debug errors on your Pi-Hole server.
Conclusion
While writing this blog post, I found out that my Pi-Hole wasn’t working properly for a while. Having forgotten that I set up the DHCP server to have Cloudflare as the secondary DNS, I didn’t even notice this.
I must also admit that over the past year, I experienced numerous outages caused by the phone shutting down or becoming unresponsive.
These two things highlight that hosting servers on your own is hard. Not only that you have to put a watchful eye on them and update them regularly, but when things break you have to put a chunk of personal time aside to fix whatever’s broken.
To this day, I don’t know the cause of the random outages. They were exceptionally annoying since besides the server being down, the phone deleted the adb_keys file so it “forgot” my PC and didn’t let me adb into it. This happened so frequently that I had to write a web server to always run on the phone (using Termux) which essentially gives read/write access to the adb_keys (requiring a password, of course). See Appendix B to see what angry coding looks like.
Despite all the challenges, the experience was incredibly educational, offering insights into networking and the Android operating system. The whole journey, fraught with trials, errors, and learning, highlights the adventurous spirit of tech enthusiasts. It’s a testament to the saying, “Necessity is the mother of invention,” and perhaps a reminder of the joys and perils of DIY tech solutions.
Thank you for joining me on this adventure, and may your digital life be forever ad-free!
Appendix
Appendix A - Configuration of Linux Deploy
Burger Settings -> Settings:
{
  "Lock screen": "✔",
  "Lock Wi-Fi": "✔",
  "Wake lock": "✔",

  "Show icon": "✔",
  "Stealth mode": "❌",
  "Autostart": "✔",
  "Autostart delay": 5,
  "Track network changes": "❌",
  "Track power changes": "❌",

  "ENV directory": "/data/user/0/ru.meefik.linuxdeploy/files",
  "PATH variable": "/system/bin",

  "Debug mode": "✔"
}
Slider Settings:
{
  // BOOTSTRAP
  "Distribution": "Debian",
  "Architecture": "arm64" ,
  "Distribution Suite": "buster",

  "Installation type": "File",
  "Installation": "${EXTERNAL_STORAGE}/linux.img",
  "Image size (MB)": "Automatic calculation",
  "File system": "ext4",
  "User name": "tal",
  "User password": "*********",

  "Localization": "C",

  // INIT
  "Enable": "✔",
  "Init system": "sysv",

  // SSH
  "Enable": "✔",
  "SSH settings -> Port": 22
}
Appendix B - Overcoming the adb_keys Issue
I’m not sure why the adb_keys file is regularly erased or deleted. I can only say it happens after the phone enters a weird restart pattern, where it restarts a couple of times seemingly into bootloader, whereafter I shut it off using a long press on the Power button, then turn it on regularly.
To overcome this I wrote a short HTTP server with Python that creates a simple HTML to view and edit the adb_keys file.
I’ve had some problems running the server automatically on phone startup and switching to root, so I utilized os.system calls with su -c "command" to execute things requiring root access.
I’m also using solely built-in libraries because I also didn’t manage to install new libraries. This is the reason for using http.server and the ugly server code.
# server.py
import hashlib
import http.server
import os
import socketserver
import subprocess

from urllib.parse import parse_qs, urlparse

PASSWORD_HASH = 'YOUR_HASH_HERE'

class GoddamnHttpRequestHandler(http.server.SimpleHTTPRequestHandler):
    def do_GET(self):
        self.send_response(200)
        self.send_header("Content-type", "text/html")
        self.end_headers()

        update_flag = False
        query_components = parse_qs(urlparse(self.path).query)
        # If query contains both adbkeys and passowrd, try to update
        if 'adbkeys' in query_components and 'password' in query_components:
            new_keys = query_components['adbkeys'][0]
            password = query_components['password'][0]
            # Check given password's correct
            if hashlib.sha256(password.encode()).hexdigest() == PASSWORD_HASH:
                # Okay all good it's me let's set up the new keys
                os.system(f"su -c 'echo \"{new_keys}\" > /data/misc/adb/adb_keys'")
                update_flag = True

        # In any case, return by displaying the current list of keys.
        # This command gets the current keys. If they don't exist because the stupid phone deleted them again, just return empty string
        keys = subprocess.check_output("su -c '[ -r \"/data/misc/adb/adb_keys\" ] && cat /data/misc/adb/adb_keys || echo \"\"'", shell=True).decode('utf-8')

        html = f"""
        <html>
        <head>
            <title>Fucking ADB Keys Manager</title>

            <style>
              html, body {
            height: 100%;
        }

        html {
            display: table;
            margin: auto;
        }

        body {
            display: table-cell;
            vertical-align: middle;
        }

            </style>
        </head>

        <body>
            <h1>Your fucking adb_keys</h1>
            <form action="" method="GET">
                <textarea name="adbkeys" id="adbkeys" required style="width: 1082px; height: 591px;">{keys}</textarea>
                <br><br>
                <input type="password" name="password" id="password" />
                <br><br>
                <button>Update this shit</button>
            </form>
            <h2>Did the server solve this shit?</h2>
            <div>{update_flag}</div>
        </html>
        """

        self.wfile.write(bytes(html, 'utf8'))

        return

class ServerToSolveThisShit(socketserver.TCPServer):
    def server_bind(self):
        import socket
        self.socket.setsockopt(socket.SOL_SOCKET, socket.SO_REUSEADDR, 1)
        self.socket.bind(self.server_address)


BEST_PORT = 9001

def main():
    server_to_solve_this_shit = ServerToSolveThisShit(("", BEST_PORT), GoddamnHttpRequestHandler)
    try:
        server_to_solve_this_shit.serve_forever()
    finally:
        server_to_solve_this_shit.shutdown()
        server_to_solve_this_shit.server_close()

if __name__ == '__main__':
    main()
Appendix C - Footnotes
-
It was at this point I decided to move to Authy which supports syncing authenticator codes to the cloud and other devices (about 4 years before Google Authenticator followed suit), circumventing the terrible consequence of breaking your phone and losing access to your authenticator codes. ↩
-
An alternative option is to enable Talkback which requires fewer steps than USB debugging, since the touchscreen is functional, the swiping motions required to control the phone can be used alongside the narrator to fully control the phone, which is an option many visually impaired persons use. ↩
-
To control the phone, I used this amazing tool called scrcpy that allows controlling the screen over
adbonce it’s enabled and allowed. If not for this tool, I’d have to do many other tasks using the screenshot methods. ↩