Recall
Last we left off, I had successfully built a working Pokémon Scanner, having understood the internals of the Pokémon Go protocol: the app communicates using client-server protobuf remote procedure calls, sending a container of multiple request types at once. One specific request type numbered 106 - GET_MAP_OBJECTS - retrieves a list of Pokémon around a specific location by its S2 cell identifier.
The scanner worked well for a couple of days, and I enjoyed the fruits of my labor (increasing the number of unique Pokémon I discovered by an order of magnitude).
However, one quiet Wednesday evening, I started my scanner for a fun session of Pokémon hunting, only to find that it didn’t work. When the scanner made the GET_MAP_OBJECTS request, it received a generic error in response. Other requests (like listing my inventory and all Pokémon I had captured) still worked, however.
I knew that a new version of the app had recently been released (0.31). Could it be that something had changed with the protobuf definitions?
Needing to see the requests the app was making, I set up an HTTP proxy. But it wouldn’t record any requests coming through. In fact, while it was enabled, the Pokémon Go app refused to start at all.
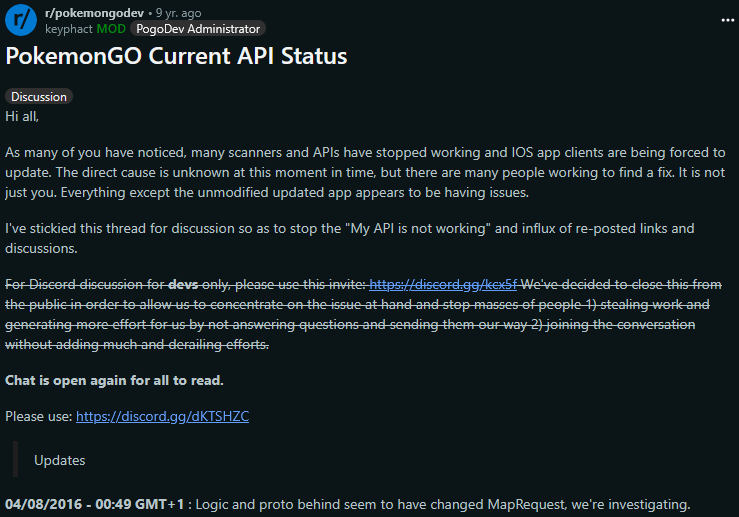
Confused, I went online to check if anyone else had encountered this issue, and what I found wasn’t too surprising: I wasn’t the only one who had thought to create their own Pokémon Go tools.
There were already several communities operating to create tools for Pokémon Go. One of the most prominent was PogoDev - a group of developers providing a complete unofficial API for Pokémon Go.
They had noticed parts of the API had stopped working, and put up a post detailing the situation - claiming that it wasn’t a simple change. They opened a Discord server for people to work together. I joined and was promptly added to #re-research, a channel dedicated to understanding why Pokémon Go’s server had started blocking forged GET_MAP_OBJECTS requests.
Little did I know, this marked the beginning of a 3-day intense marathon to overcome an advanced anti-cheat mechanism employed by Niantic, the full story of which I will lay out here. I will detail important milestones of the research, telling it through 6 phases of discovery, explaining the four techniques we used along the way.
Did we make it? You’ll have to read all the way to the end to find out!
I’m giving a talk at DEF CON 33 about the entire Pokémon Go scanner research as well as this hackathon. A link to the talk will be provided once it’s uploaded to Youtube.
The First Defense - Certificate Pinning (1st day - 1am)
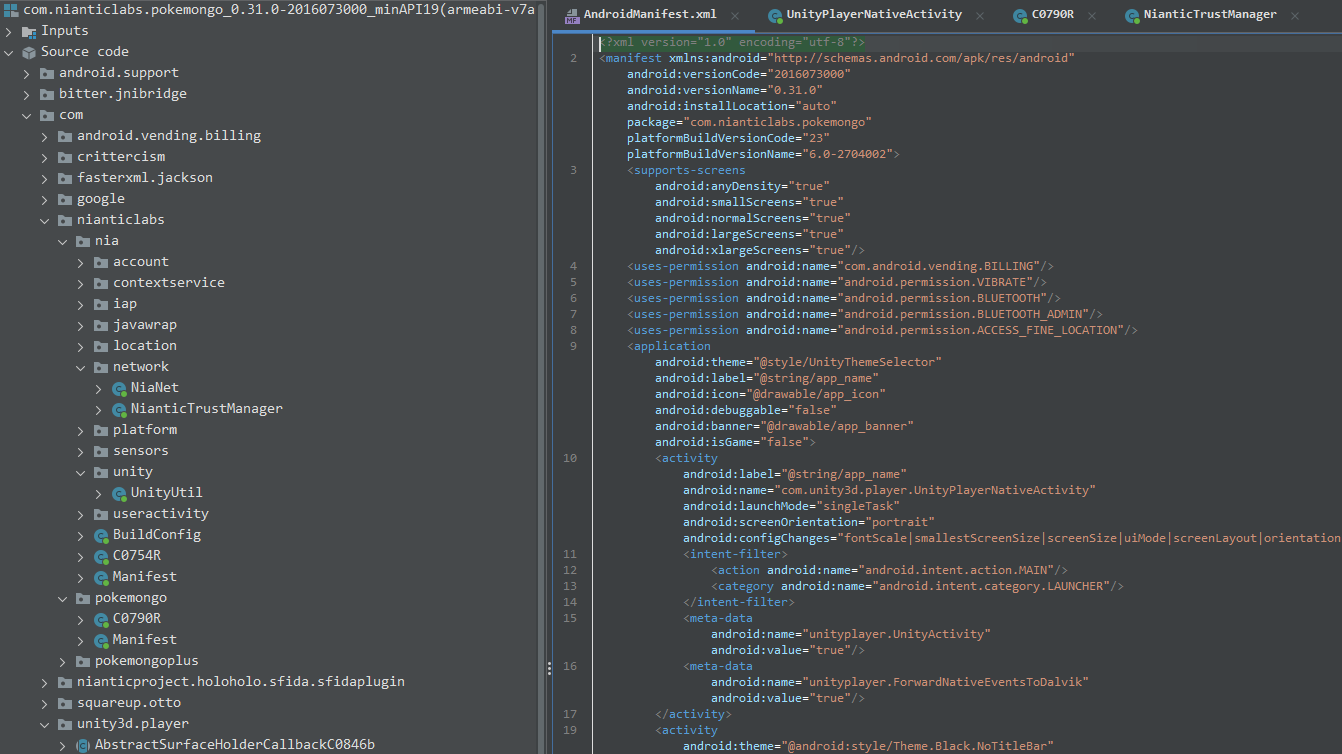
Shortly before I joined the Discord server, other researchers had already spotted an interesting class that blocks HTTP proxies, which had been added to the Java part of the app, named NianticTrustManager:
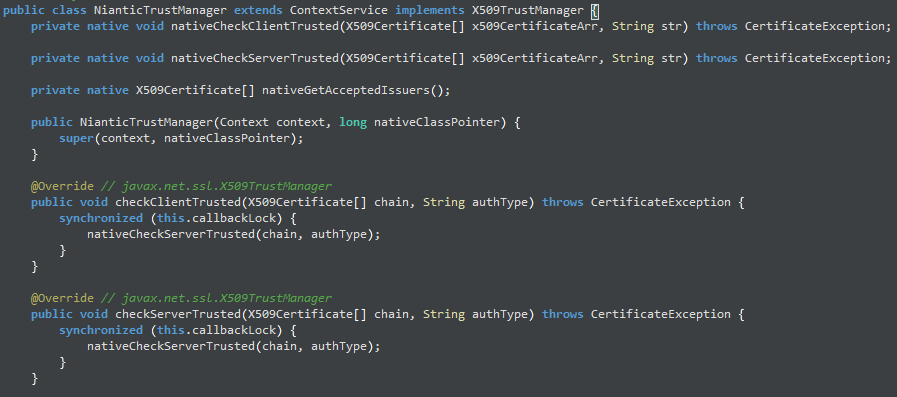
It was spotted quickly because it extends the X509TrustManager interface, something very commonly done when certificate pinning is at play.
But what is certificate pinning? And why would it block HTTP proxies from working? First, we need to understand how HTTP proxies work.
The Magic Behind HTTP Proxies
At a very high level, proxies stand in the middle between a client and a server. They accept HTTP requests from the client, log them, and forward them to the server. Then, they do the same for the server’s response.
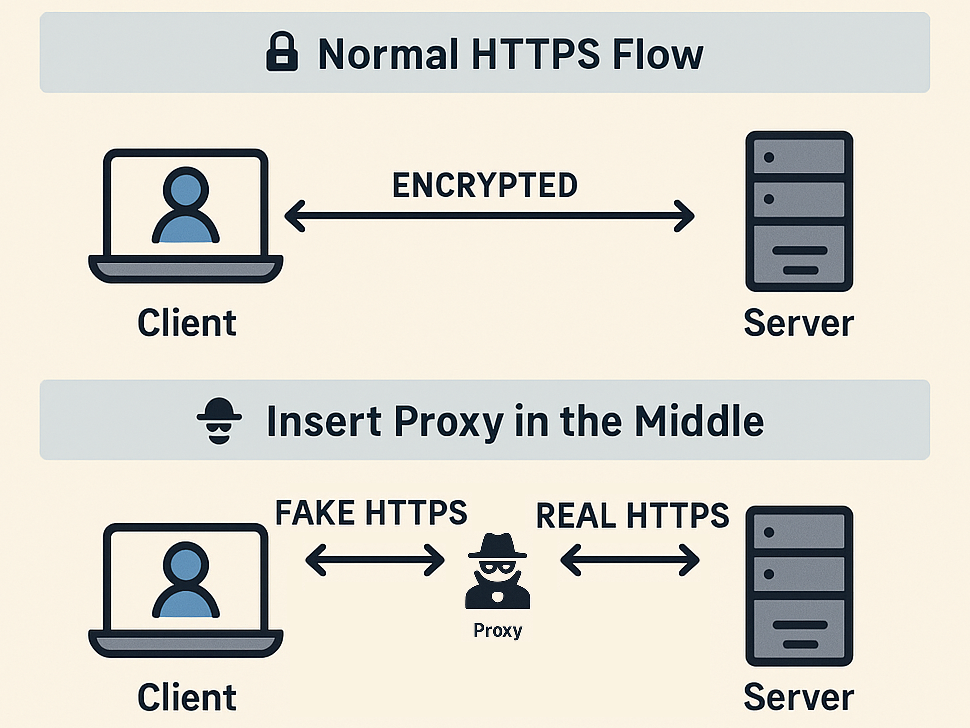
However, we’re talking about HTTPS, where the last letter stands for “Secure”. This means that all messages are encrypted. How does this encryption work?
The server and the client agree on a key and communicate in an encrypted session under that key. But beyond confidentiality, HTTPS also promises integrity - ensuring that you’re talking to the real server. This is done by taking the server’s certificate and validating it before communication begins.
Of course, an HTTP proxy breaks that promise by logging all the requests. This still works by setting the HTTP proxy as a Certificate Authority (CA) on the client device, which allows the proxy to generate and sign certificates for any domain it wishes (which shows why any security issue with official CAs is a huge problem). This makes the man-in-the-middle communication possible.
What is Certificate Pinning?
The Certificate Pinning defense method targets HTTP proxies in particular - it works by having the developer embed the public key of the real server the app is going to talk to into the app’s code.
Additionally, a short piece of code is added that, when a new HTTPS session begins, checks that the public key given by the server matches the hard-coded one, accepting the session only if it does.
An HTTP proxy has to generate a new pair of keys for any domain it wishes to imitate, so its public key will not match any hard-coded one, making the app block any proxying attempts.
Bypassing Cert Pinning: Finding the Right Place
The first step towards bypassing certificate pinning is to find the piece of code that validates the server public key against a hard-coded one.
In our case, this had already been done by finding the class NianticTrustManager and its function checkServerTrusted. Looking for classes extending X509TrustManager is one way, but some apps try to mask the relevant piece of code in various ways. Luckily, that wasn’t the case with the Pokémon Go app.
The second step is targeting the specific function to make it accept any server certificate using a new technique - Dynamic Reverse Engineering!
New Technique: Dynamic Reverse Engineering
Dynamic RE involves intervening in the application during runtime (analogous to debugging your code and changing variable values).
For Android, there are several frameworks that provide the ability to hook functions - one of which is the Xposed framework, with which you can hook any Java class function by name, and run code before or after every time it executes, changing arguments or return values.

Bypassing Cert Pinning: Utilizing Xposed
In this short Xposed module, we hook the checkServerTrusted function of the NianticTrustManager class, and insert a hook every time it is called, replacing its first argument (the server certificate to verify) with the original server’s certificate chain (taken directly from the public server).
final Class NianticTrustManagerClass = lpparam.classLoader.loadClass("com.nianticlabs.nia.network.NianticTrustManager");

X509Certificate[] cert = new X509Certificate[0];

findAndHookMethod(NianticTrustManagerClass, "checkServerTrusted", cert.getClass(), String.class,
        new CheckServerTrustedHook()
);

final String ORIGINAL_CHAIN = "...";

// ...

    @Override
    protected void beforeHookedMethod(MethodHookParam param) throws Throwable {
        XposedBridge.log("Injecting Pokémon Go certificate trust chain");

        // Decode the stored original chain
        byte[] buffer = Base64.decode(ORIGINAL_CHAIN, Base64.DEFAULT);

        // Restore the original chain object and inject it into the call arguments
        param.args[0] = (X509Certificate[]) SerializationUtils.deserialize(buffer);
    }
This way, no matter which certificate is presented to the application - the code accepts it as verified, and we were able to see traffic again in our HTTP proxy!
Having seen the traffic, we discovered that our initial guess - that the protobuf definitions had changed - was wrong. They were almost exactly the same as before the update.
We only managed to find that certain request types had started receiving an error from the server: 400 Bad Request, with GET_MAP_OBJECTS being one of those.
Finding The Change
Something had definitely changed in the protocol. If not the protobuf definitions, then what?
Looking again at the client-server protocol, we wanted to understand exactly what data the server expected, as this might be the change. The best technique to use for this is called Active Probing.
New Technique: Active Probing

In Active Probing, we take a valid request made by the client (in our case - capturing a RequestContainer the app sends), and replay it to the server repeatedly, omitting fields one by one until an error is returned.
The method identifies what data the server treats as required.
I had used this for the initial version of my Pokémon Scanner, which sent minimal requests, as most of the fields were optional for the server to return a valid response.
Using Active Probing to Find the Culprit
With Active Probing, we found that one specific field in the RequestContainer that was previously optional and not understood was now required to get a valid response from the server: the sixth field, which we called Unknown6.
The field type was a message with this basic form:
message Unknown6 {
    int32 unknown1 = 1;
    Unknown2 unknown2 = 2;

    message Unknown2 {
      bytes unknown1 = 1;
    }
  }
The actual required data was under Unknown6.Unknown2.unknown1. We called the entire thing U6 for brevity.
Having discovered that a previously optional field was now required, it became our sole focus. It was only natural that we adopted it as our official name: Team Unknown6!
Understanding Unknown6
The first step towards uncovering what U6 contained started by inspecting its format, utilizing yet another technique: Passive Analysis.
New Technique: Passive Analysis

Seen as the counterpart of Active Probing, in Passive Analysis you view the data being sent between the client and server and infer details about it.
By slightly changing the state of the client - like its location, settings, and actions taken - and seeing how the data sent from the app changes, much can be concluded.
I had actually used this technique in the previous post while understanding the Pokémon Go protocol, used for identifying the meaning behind some of the protobuf fields.
Using Passive Analysis for Unknown6 Discoveries
To properly employ Passive Analysis, we recorded the client making requests and extracted dozens of U6 samples. Using these, we discovered something unique about the byte array in U6: its size!
It turns out it’s always a multiple of 256, plus 32.
One researcher found that if they continuously set the phone’s time to the exact same second, the first 32 bytes of the byte array were always the same. This meant that the byte array had a header that was only determined by time.
Additionally, using Active Probing, we found that U6 was closely tied to the request: taking a valid U6 and changing the request just slightly (for instance: just the cell ID within a GET_MAP_OBJECTS request) would cause the server to return an error. So, the field was not only required, but heavily dependent on the request it was sent along with.
This realization, combined with the magic number 256 and the relation to time, made us guess that U6 was probably an encrypted signature for the request.
It had previously been generated by the Pokémon Go app, but now Niantic had flipped a switch and the Pokémon Go server had started verifying it, blocking our attempts at forging requests without attaching a valid U6.
I remember the realization sinking in - that we were facing an advanced anti-cheating mechanism that blocked all unofficial API libraries. We figured this will take days to overcome, if we even manage to.
Next up, we utilized our understanding of U6 to find exactly where it was generated.
Pinpointing the Function
We knew that all code related to Protobuf resided within the native code of the app. Specifically, in the libNianticLabsPlugin.so library.
Before continuing though, I keep mentioning the “Java” and the “native” parts of the app. What does that even mean?
Java vs. Native
An Android application has two parts: The first is the high-level layer usually written in Java: the Application Framework. This part interacts with the OS (Android) and handles user interactions.
The second is the native code layer, typically written in C/C++, compiled, and inserted as a library into the app. It’s used for performance-critical operations or utilizing low-level libraries. Games in particular involve a lot of heavy graphical calculations and are usually built on top of existing frameworks (in Pokémon Go’s case - Unity).
The two layers communicate via the Java Native Interface (JNI), which is a simple bridge allowing native functions to be called from the Java code.

So it’s not surprising that Pokémon Go’s communication protocol and in particular handling Protobuf objects is part of the native layer.
To understand the code of the Pokémon Go application, we need to use the fourth and last technique: Static Reverse Engineering!
New Technique: Static Reverse Engineering
The counterpart to Dynamic Reverse Engineering - the Static version has to do with understanding the app’s code without running it.
Since code is usually compiled, we need to use special programs that take the reverse step to disassemble and decompile the code, to reach a result as close as possible to its original version as the developer wrote it.

The programs allow you to inspect the code in different ways, such as viewing functions in graph form, generating function call chains, checking static memory references, viewing usage of imported functions, and more.
Additionally, they allow editing the decompiled version of the code to better reflect the original - naming functions and variables, defining structures, and altering the memory layout. Doing this enables making sense of complicated parts of the code.
To apply Static RE for high-level code like Java, which is compiled into an intermediate language, we use reflection tools like Jadx. This process is mostly straightforward, and leads to a version of the code very close to the original.
The native code, however, requires more advanced tools - like IDA or, released more recently, Ghidra. These tools go through the process of disassembling and also automatically decompiling it back to valid C code. Static RE of low-level code, however, is still notoriously difficult.
Detecting the Function
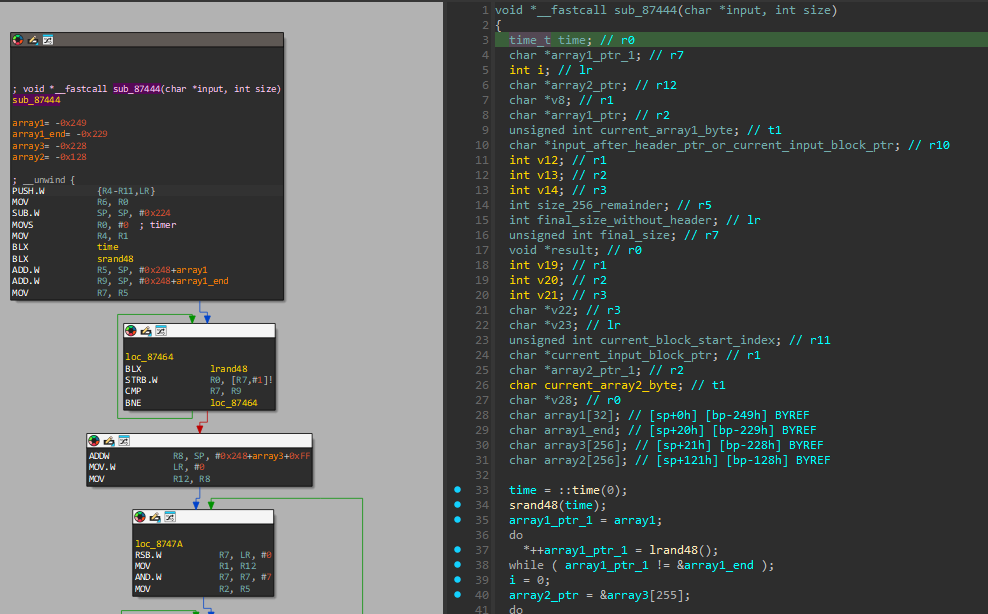
About 5 hours after the analysis of the U6 format, we had a huge breakthrough: we found the function that creates U6!
There were multiple ways in which researchers were able to pinpoint it using Static RE. I’ll share 3 methods here:
Method 1: Using Time
This method was the one I used back then.
Recall that we found the starting 32 bytes of U6 were only dependent on time. Therefore, the code using them needed to call the time system function.
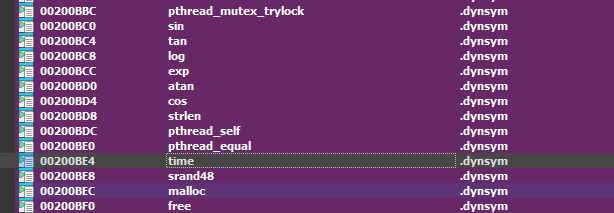
When compiled C code needs to use an externally-available function, it typically needs to import it (unless it’s compiled statically, but that’s more advanced and isn’t the case here).
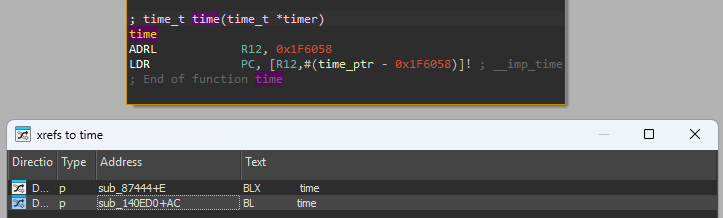
So, I went to IDA’s import tab and found that indeed, time was being imported, and with just 2 references in the code!
One was clearly irrelevant, while the other one - the function at offset 0x87444 - called srand with the output of time - setting the seed of the pseudorandom generator to the time.
It then calls lrand, which generates a random byte exactly 32 times. This, and seeing multiple mentions of 256 in the code pointed to this being the right function.
Method 2: Device Info
Another method came from the educated guess that signature schemes usually rely on information that is tied to the device - like its serial number, model, screen size, etc.
These pieces of information are read from the Android OS using strings. And indeed, when searching through strings used by the library, we found multiple with the prefix hardware.DeviceInformation.*.
Searching for references in code, you land at a function at offset 0x12C428 loading these into static memory addresses. These pointers are used in another function at offset 0x40640, which creates a protobuf object populated with the device information.
There’s only one caller to the function at offset 0x40640, which also calls 0x87444 right after.
Method 3: Compiled Proto Match
One last method that was used is based on compiled-protobuf matching.
Since we knew the format of U6 (a simple message containing two fields, one is a message containing a byte array), you could take this definition, use protoc to generate a library in C and compile it.
You then search for assembly patterns from this compiled version within Pokémon Go. This pinpoints the function that also calls 0x87444.
The technique works because protoc’s output is deterministic. This is similar to how anti-virus software detects known malicious programs.
Validation Using Dynamic Reverse Engineering
With the methods above, we had identified a suspected function for creating U6 at offset 0x87444 which we called sigEncryptFunction (as we strongly believed the function was in charge of encrypting some signature over the RequestContainer)
We still needed to verify beyond doubt that we had landed on the right function. Time to employ some Dynamic RE again!
This time, we used Frida, a well-known framework for injecting Javascript into Android apps.
The script below finds the real address of sigEncryptFunction, hooks it and dumps the arguments on function call and its return value on function return.
var sigEncryptFunctionPointer = nativeLibBaseAddress.add(0x87444);
console.log("Hooking sigEncryptFunction at: " + sigEncryptFunctionPointer);
Interceptor.attach(sigEncryptFunctionPointer, {
    onEnter: function (args) {
        console.log("Function 0x87444 entered! Parameters: " + args[0]
          + ", " + args[1]);
        this.input = args[0];
        this.inputSize = args[1].toInt32();
        console.log(Memory.readByteArray(this.input, this.inputSize));
    },
    onLeave: function(retval) {
        console.log("Function 0x87444 returned!");
        // We save values into `this` to allow us to retrieve them here.
        console.log(Memory.readByteArray(this.input,
                this.inputSize + (256 - (this.inputSize % 256)));
        // The calculation on the input's size will be clearer soon.
    }
})
By collecting outputs of the sigEncryptFunction and matching them against what was actually sent by the app in U6, we found that they were indeed the same and that we had identified the right function!
Another discovery from hooking the function was that we were able to see its input - the signature before encryption. And, it turns out it’s also a protobuf object!
Simulating sigEncryptFunction
Now, it was necessary to dig into sigEncryptFunction and completely decompile it.
Decompiling the Function
The code behind sigEncryptFunction happened to be relatively simple. It’s outlined below, in parts, accompanied by a visualization of the input.

At the beginning, which we used to identify the function, it seeds the pseudorandom generator using a call to time, and then generates 32 random bytes and appends them to the input as a prefix.
void sigEncryptFunction_87444(char *input, unsigned int size) {
  // ...
    srand48(time(NULL));
    for (int i = 0; i < 32; i++)
        iv_seed[i] = lrand48() & 0xff;

    memmove(input + 32, input, size);
    memcpy(input, iv_seed, 32);

Then, the input array is padded with 0s to the next multiple of 256, and the final byte is the remainder (so the server can easily strip the padding).
    size_remainder = 256 - size % 256;
    final_size_without_header = size + size_remainder;
    final_size = final_size_without_header + 32;

    if (final_size_without_header > size)
    {
        memset(input + 32 + size, 0, final_size_without_header - size - 1);
    }
    input[totalsize - 1] = size_remainder;

And finally - encryption!
  for (int i = 0; i < 8; j++)
        for (int j = 0; j < 32; i++)
            current_iv[32*i + j] = ((iv_seed[i] >> ((-i) & 7)) | (iv_seed[i] << i))

    for (int current_block = 32; current_block < final_size; current_block += 256)
    {
        for (int i = 0; i < 256; i++)
            input[current_block + i] ^= current_iv[i];
        encryption_9e9d8(input + current_block, block_encryption_output);
        memcpy(current_iv, block_encryption_output, 256);
        memcpy(input + offset, block_encryption_output, 256);
    }
First, the seed is expanded to a 256-byte initialization vector (IV), using a common expansion based on the individual bits of each byte.
The input is then encrypted block-by-block: the first block is encrypted using the expanded IV.

Then, the encrypted block is used as the IV for the encryption of the next block, and so on until the entire input is encrypted.


This style of encryption is known as CBC mode.
Once we’d figured out the general schematic of how sigEncryptFunction operates, we split into two groups: one dedicated to understanding the block encryption process and recreating it (so we could encrypt any input we wished), and the other focused on understanding how to reconstruct the input protobuf object.
The Dump and Compile Method
Just 6 hours later, the first group had successfully managed to do their part: they had created a 14,000-line long C file that successfully compiled and allowed for encryption of any input, exactly as sigEncryptFunction operated.

The group first tried to identify the encryption scheme as a well-known one, but were not successful. Digging into encryption_9e9d8 proved extremely difficult.
So what did they do? An extremely wise use of the IDA decompilation feature: Remember how I said IDA can decompile assembly to valid C code? Even if not usually pretty or human-understandable, it still compiles and perfectly matches what the original assembly code does.
So the team viewed the functions in the call graph of encryption_9e9d8 (meaning - all functions that can be reached from the call to encryption_9e9d8), and dumped their decompiled IDA version.
This code was appended to a huge C file. Some small fixes later and the result could be compiled into a version that can be used as a library to encrypt any given input.
Previously dumped protobuf inputs were tested and the results matched what was recorded as their output - and so we had a working encryption!
Meanwhile, the second group (that I was a part of) worked on identifying how the input protobuf object was constructed. We called it - Signature.
Reconstructing the Signature
It isn’t easy understanding protobuf constructions from compiled C code. Working with complex objects at such a low level turns into a hugely complicated mess of assembly code.
Much of the analysis and conclusions were reached similarly to how I figured out the protocol while building the PokeScanner, which involved all 4 techniques.
Figuring Out Sub-messages
The easiest fields to figure out were the sub-messages that had clear string values: fields 4 and 9.
The message of field 4 contained very precise GPS information. Basically all values that the application receives from the OS:
message LocationFix {
    string provider = 1; // "network", "gps", "fused", ...
    uint64 timestamp_snapshot  = 2; // In ms since start
    float altitude = 4; // Found in iOS
    float latitude = 13;
    float longitude = 14;
    float speed = 18; // In m/s, only in iOS. -1 for no value
    float course = 20; // Only in iOS. -1 for no value, valid range is 0 to 360
    float horizontal_accuracy = 21;
    float vertical_accuracy = 22; // Only in iOS
    uint64 provider_status = 26; // 1 - no fix, 2 - acquiring/inaccurate, 3 fix acquired
    uint64 always_1 = 28;
}
The message of field 9 contained the device information I referenced in the second technique that was used to pinpoint sigEncryptFunction:
message DeviceInfo {
    string device_id = 1; // As hex string
    string android_board_name = 2;
    string android_bootloader = 3;
    string device_brand = 4; // product.brand prop
    string device_model = 5; // product.device prop
    string device_model_identifier = 6; // build.display.id prop. Only in Android
    string device_model_boot = 7; // boot.hardware prop
    string hardware_manufacturer = 8; // product.manufacturer prop
    string hardware_model = 9; // product.model prop
    string firmware_brand = 10; // product.name prop. In iOS - "iPhone OS"
    string firmware_tags = 12; // build.tags prop. Only in Android
    string firmware_type = 13; // build.type prop. In iOS - version
    string firmware_fingerprint = 14; // build.fingerprint prop. Only in Android
}
And the message of field 7 was found by accident: many of us were using emulators to generate Signature samples, and we noticed field 7’s message was empty in emulator samples, whereas regular devices had this message filled with data. This led to the conclusion that it contained sensor information.
message SensorInfo {
    uint64 timestamp_snapshot = 1;  // in ms since start
    double linear_acceleration_x = 3;
    double linear_acceleration_y = 4;
    double linear_acceleration_z = 5;
    double magnetic_field_x = 6;
    double magnetic_field_y = 7;
    double magnetic_field_z = 8;
    int32 magnetic_field_accuracy = 9;
    double attitude_pitch = 10;
    double attitude_yaw = 11;
    double attitude_roll = 12;
    double rotation_rate_x = 13;
    double rotation_rate_y = 14;
    double rotation_rate_z = 15;
    double gravity_x = 16;
    double gravity_y = 17;
    double gravity_z = 18;
    int32 status = 19; // Similar to GPS info, this seems to be 3 when all sensors data is successfully retrieved
}
And that’s how the Signature message looked:
message Signature {
    repeated UnknownMessage field1 = 1;
    uint64 timestamp_since_app_start = 2;
    string field3 = 3;
    repeated LocationFix location_fix = 4;
    repeated UnknownMessage field5 = 5; // Android only
    repeated UnknownMessage field6 = 6;
    repeated SensorInfo sensor_info = 7;
    DeviceInfo device_info = 8;
    UnknownMessage field9 = 9; // iOS only
    int32 field10 = 10;
    bool field11 = 11;
    bool field12 = 12;
    int32 field13 = 13;
    int32 field14 = 14;
    string field15= 15;
    int32 field16 = 16;
    string field17 = 17;
    string field18 = 18;
    bool field19 = 19;
    int32 field20 = 20;
    bool field21 = 21;
    bytes field22 = 22;
    uint64 timestamp = 23;
    repeated uint64 field24 = 24;
    int64 field25 = 25;
    int32 field27 = 27;
}
At this point in the hackathon, we were almost 48 hours in with little to no sleep. The Discord server itself was absolutely wild - while the main research channel only allowed the hacking group to chat in, it was publicly viewable.
I recall hundreds of people were in voice chat, talking about every message we sent in that channel. This situation felt surreal.
In addition, the server had grown so much that we had to approach Discord and ask them to increase the member limit to 10,000. Servers growing to this size so quickly wasn’t common back then.

Something else had happened - some members using Active Probing got their accounts banned. This and the inclusion of device-specific information in the Signature object fueled fears in the community that Niantic was using this data to detect forged API requests. Information like sensor data and GPS information is very hard to accurately fake, akin to mouse movement tracking for captchas.
Using Active Probing to Ignore Fields
Anyway, back to understanding Signature.
A few hours in, we had an epiphany - how could the server verify things like sensor data? Doing this requires massive complexity, and we knew the traffic of the first few weeks had already put major burden on their servers with the number of players wanting to catch Pokémon.
So, by using Active Probing combined with Dynamic RE, we hooked the sigEncryptFunction and removed fields from the Signature object until the server returned an error, to figure out which fields were not required.
It turns out…most of them were optional!
There were only 6 required fields: 2, 10, 20, 22, 23 and 24. Two of which (2 and 23) are simple timestamps. So, we changed our focus to figure out where the other fields were created in the native code.
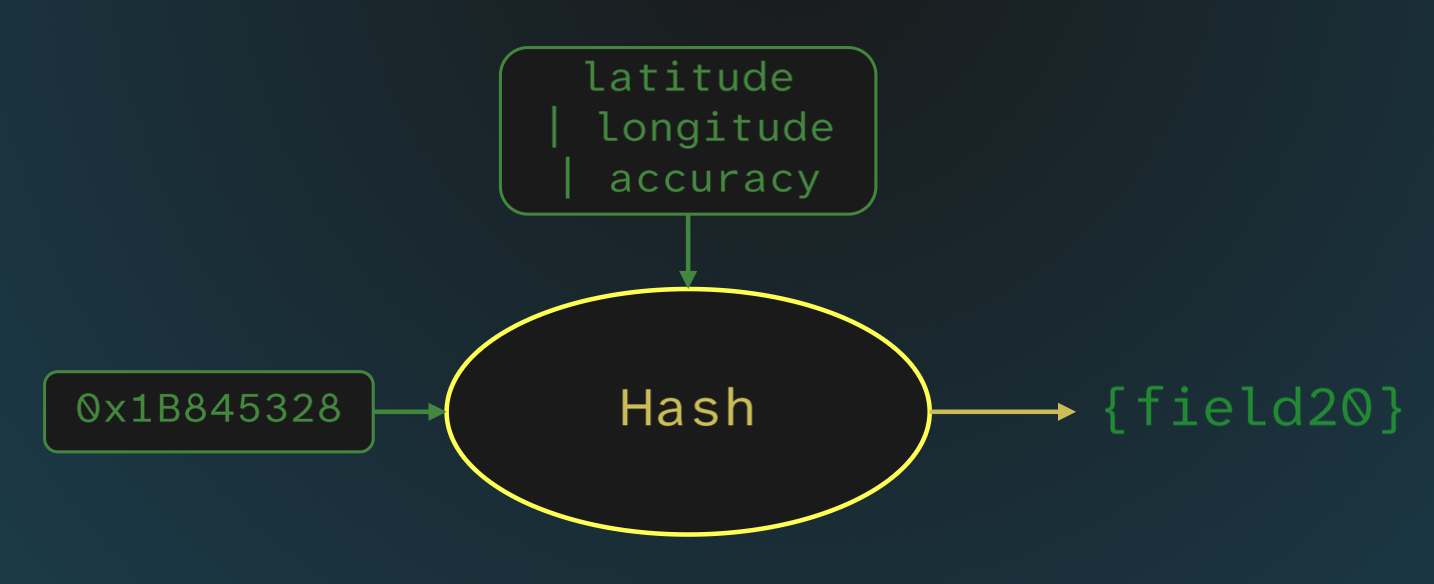
Determining Fields (20 and 10)
We started by finding that fields 10 and 20 were created right before the call to sigEncryptFunction.
They were both a result of a call to the same function, which takes as input a string and a 32-bit integer, and outputs another 32-bit integer.
Due to this behavior, we figured - it’s a hash!
Field 20 was the result of applying this hash to the hard-coded integer 0x1B845328 with the string that is the concatenation of the user’s latitude, longitude and accuracy (these appear as 3 fields in RequestContainer).
Whereas field 10 was similar if a bit more complicated: it first hashes the authentication byte array (also taken from RequestContainer) with the hard-coded integer 0x1B845328. The resulting integer is then fed into another hash call, now with the concatenated location. The result is field 10.
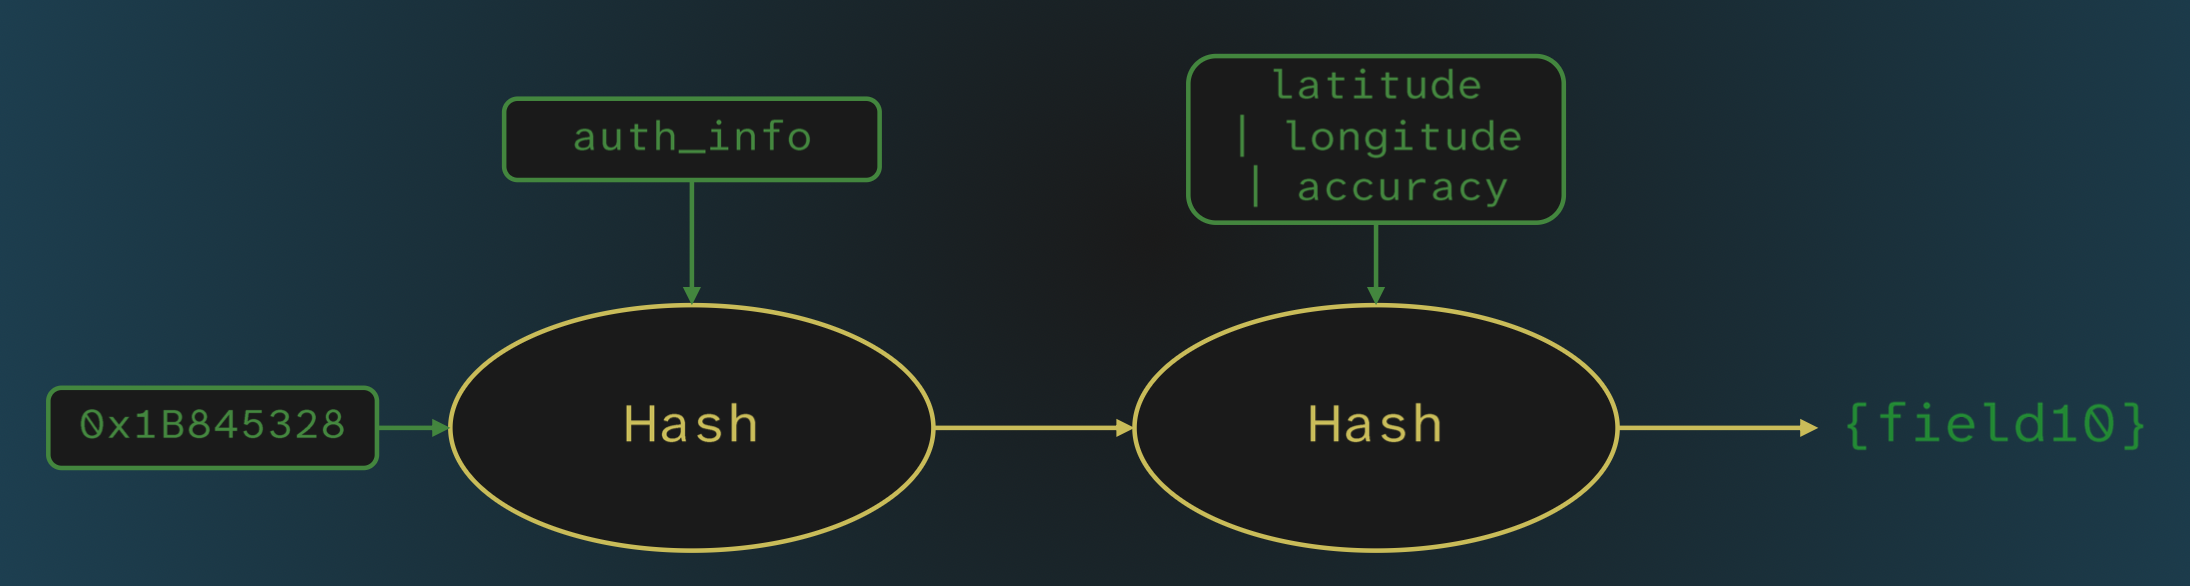
This gave us two hashes of the user’s location, one of which was also dependent on the user’s authentication data.
What’s That Hash? (Field 24)
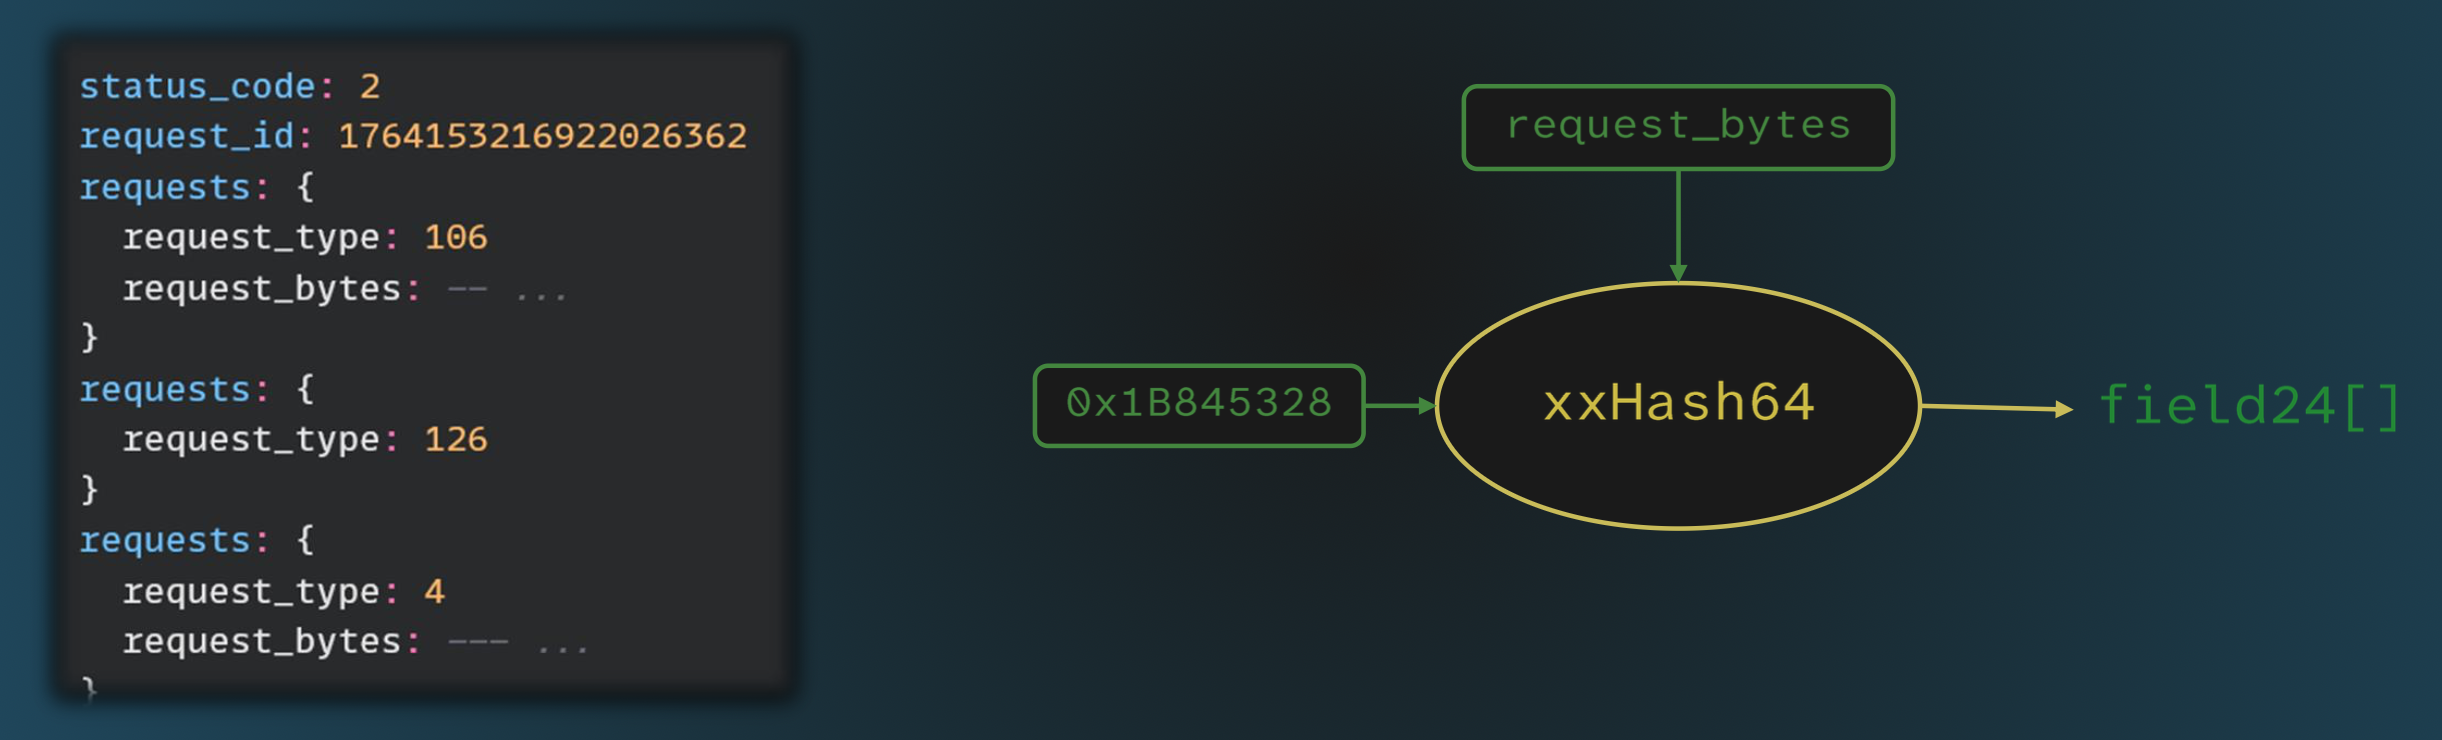
Once we understood the function was a hash - we tried identifying the specific algorithm. Based on constants found within, we determined it was xxHash, a well-known fast hashing function.
While fields 10 and 20 utilized the 32-bit version of the hash, we also found the 64-bit version embedded in the code. And, actually, it was used to populate the repeated field 24!
For this field, Dynamic RE determined that each request sent to the server within the requests repeated field in the RequestContainer was hashed using xxHash64 with the hard-coded integer 0x1B845328, and added to field 24.
The Last Nut to Crack (Field 22)
We were left with just one more field to crack - 22. It proved very difficult, mostly because passive analysis had led us in the wrong direction for a while.
The field was found to change quite frequently. We had suspected it acted as a guard against replay attacks (using the same signature to send the same request over and over again). We also noticed it seemed to change every time the user’s authentication data changed, making us chase where it was being used in the code.
However, a breakthrough happened when one researcher managed to find the specific function whose output populated field 22 - and found it received absolutely no input!
This meant that field 22 could contain any value, as long as it was present in the request.
By 7pm of the 3rd day of the hackathon, around 67 hours since we started cracking this puzzle - a researcher had made the first successful unofficial GET_MAP_OBJECTS request!
Making a Valid API Request
You can see below my code from back then that sends a successful request, feel free to judge :)
def _create_encrypted_signature(self, latitude, longitude, accuracy, data):
    signature = Signature_pb2.Signature()

    auth_ticket_hash = xxhash.xxh32(self.request.auth_ticket.SerializeToString(), seed=0x1B845238).intdigest()

    if not accuracy:
      accuracy = "\x00" * 8
    signature.field10 = self.hash_location(auth_ticket_hash, d2h(latitude) + d2h(longitude) + d2h(accuracy))
    signature.field20 = self.hash_location(0x1B845238, d2h(latitude) + d2h(longitude) + d2h(accuracy))
    signature.field24.append(self.hash_auth(self.request.auth_ticket.SerializeToString(), data))

    signature.field22 = hashlib.md5("yeah").digest()
    signature.timestamp_snapshot = 60000
    signature.timestamp = int(time.time() * 1000)
    return self._encrypt_with_lib(signature.SerializeToString())

def _hash_location(self, seed, data):
    return xxhash.xxh32(data, seed=seed).intdigest()

def _hash_auth(self, auth_ticket, data):
    auth_ticket_hash = xxhash.xxh64(auth_ticket, seed=0x1B845238).intdigest()
    return xxhash.xxh64(data, seed=auth_ticket_hash).intdigest()

def _encrypt_with_lib(self, data):
    encrypt_dll = ctypes.cdll.LoadLibrary("encrypt.dll")
    encrypt_dll.argtypes = [ctypes.c_char_p, ctypes.c_size_t, ctypes.c_char_p, ctypes.c_size_t, ctypes.POINTER(ctypes.c_ubyte), ctypes.POINTER(ctypes.c_size_t)]
    encrypt_dll.restype  = ctypes.c_int
    output_size = ctypes.c_size_t()
    output_size.value = len(data) + 32 + (256 - len(data) % 256)
    output = (ctypes.c_ubyte * output_size.value)()

    ret = encrypt_dll.encrypt(data, len(data), "\x24" * 32, 32, ctypes.byref(output), ctypes.byref(output_size))
    return "".join([chr(x) for x in output])
Aftermath
Once we reached a stable version of the API, Team Unknown6 released it publicly for tool makers to use.
The team treated the effort as crucial to maintaining a positive community for creating Pokémon Go tools. We strongly believed that having a publicly available API was a necessity to achieve this.
Lack of community-built tools undermines playability for people who are not able to access the game like everyone else. It also deters scamming attempts on vulnerable players. We held the position that the best case scenario would be for Niantic to publish a limited API that allows creation of helpful tools, while employing an anti-cheating mechanism aimed at blocking bots and cheaters.
Returning to this research and uncovering all the missing details, I was interested to see what had happened to the Pokémon Go community scene in the 9 years that have passed.
Team Unknown6’s effort is commemorated in PogoDev’s Github, thanking all the talented people involved (you can also see my name down there!).
The PogoDev community had remained active for around a year and a half after the hackathon, maintaining public API access after every version release (which happened quite frequently). By their latest signature generation code, it seems that they had moved the signature hashing behind server-side validation.
Protobuf-extraction projects had continued operations until around 2 years ago. It’s very interesting to see how the definitions progressed over the years.
So, it seems like no public API has been available for many years at this point. What happened to the scene?
My short research found that there are still many, many, many bots offered for sale online. So Niantic’s efforts did not manage to stop those.
There are also phones on sale with “unlocked” versions of the Pokémon Go app (wouldn’t buy those if I were you). I also found a bunch of guides on how to spoof your GPS location without Niantic finding out.
All of this is a far cry from what could have been if official APIs were available.
Thanks
I would like to thank Team Unknown6 and the entire PogoDev community - working towards this goal was an experience I’ll never forget. It showed me how hacking can be used for the benefit of the community and enabling access.
And also, thank you for reading! Until next time.